 .app
Lesson
Finger placement on the keyboard
Touch typing course
Your account saves your results and progress. 3 days of the whole course, free and with no card.
About the course
Touch typing course
This lesson is for reading. You type in the course exercises - that's where you see your result after every attempt.
109 exercises - from the home row through capital letters to longer texts. 20 minutes a day is enough.
What an account gives you
- Results and progress saved lesson by lesson
- Error stats - see which letters you mix up most often
- The whole course for 3 days - free, no card required
- Move your results from this browser to your account
After that, $29.99 once, for good, with no renewals - with a certificate once you pass the test.
The key to fast touch typing is following the fingering rules - each finger is assigned to particular keys. Success depends on striking every key with the right finger, and ALWAYS the same one.
You can change the standard rules described below, but the change has to be permanent: from then on, you always strike that key with the finger you chose.
The need to change the standard fingering usually comes from the shape of your hand and the layout of your keyboard. For example, the length of your pinky compared with your ring finger can matter for the + key on the numeric keypad. If you consider a change, use the finger that's closest to the key in the home position and whose use changes your hand position the least.
» Home position = home keys
Take the home position:
- the fingers of your left hand rest on the keys A-S-D-F,
- the fingers of your right hand rest on J-K-L-;
- both thumbs are over the space bar.
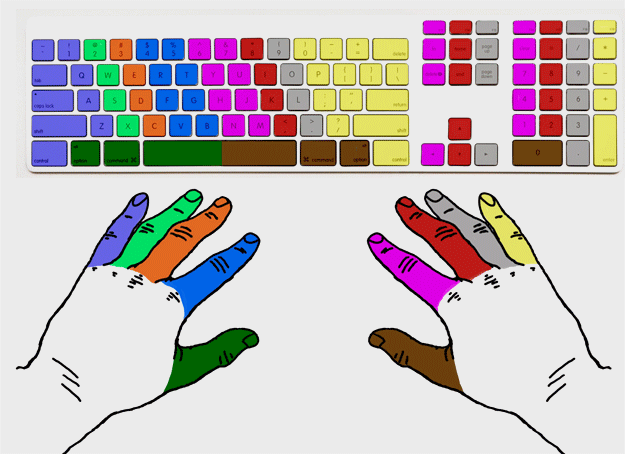
NOTE: the small bumps or ridges on the F and J keys help your index fingers find the home keys.
- Your fingers stay in the home position all the time and go straight back to it after each keystroke.
- Strike the keys softly with your fingertips. All movement comes from your fingers, hands and wrists. Your elbows stay still.
» Which finger for the other keys
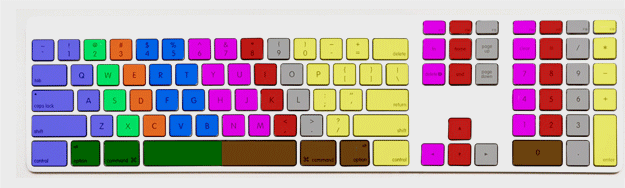
In the picture below, each color marks the group of keys pressed by one finger. The letters sit in the same places on US and UK keyboards, so the fingering for letters is the same on both.
Home position (see above): the fingers of your left hand (except the thumb) rest over a, s, d and f, and the fingers of your right hand (except the thumb) over j, k, l and ";". Your thumbs press the space bar.
Try it without an account
These exercises work right away, no sign-up needed - try them to see what learning in the course is like.